Tier List
IMPORTANT This Tier List assumes max competency by the player with each character and being able to reliably dodge/counter boss attacks. If you're taking minimal damage and can dodge/counterattack everything difficult enemies are throwing at you, the value of tanks/healers goes down dramatically unless they provide some other form of utility/damage to make up for it.
- SS: A character in this tier would go so far above and beyond lower tier options that the sheer opportunity cost of not using them would be actively detrimental to your gameplay.
- S+: A character in this tier is the best of the best in their particular role with no notable flaws or downsides.
- S: A character in this tier is as good as a S+ character in their role, but have some kind of flaw that lowers their potential. This flaw is not noticeable or detrimental enough to warrant a lower tier placement.
- A: A character in this tier is very good, but have one or multiple flaws that hold them back from a higher placement. What strength they do have isn't on the level of an S tier character.
- B: A character in this tier does their job competently, but higher tier characters likely do this job better.
- C: A character in this tier is simply outclassed in nearly, if not every, regard by a readily available alternative(s).
v 1.1.0
The new tier list is still a work in progress, as this version was just released. We'll reposition the other characters after we've done more testing.
 Hinagiku AkibaNEW ENTRY SS support – Hina does literally everything, with her weakest job (DPS) still being equivalent to S tier. Her breaking and supportive utility is so unbelievable that I can’t even imagine a world where her kit would be powercrept. With literally no flaws that I can find and pure upsides for running her on any team Hina has earned her SS tier placement.
v 1.0.10
 Kazuki AoyamaS+ breaker – He outperforms Senju in almost every aspect except raw shield value, which isn’t crucial for a breaker role.
 Hyakuichitaro SenjuS, as Kazuki has essentially set the new gold standard.
 Yo KuronakaS for similar reasons.
 Tsuki IrohaS+ DPS – Recent tension card changes make it significantly easier for her to trigger her ultimate.
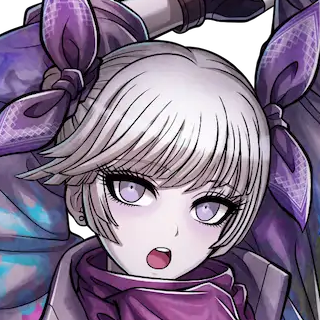 Enoki YukigayaS+ DPS – She can now dodge and counterattack during her secondary post-buff, which greatly improves her safety and heat generation. The updated tension card mechanics allow her to exploit more multiplier options and nuke faster.
 Tsuruko SembaS in support – Although her unique value lies in being a healer who can also damage, that isn’t enough for an S+ ranking. She remains a solid character, with her DPS build being the strongest option, even though the lack of a dedicated DPS ultimate keeps her in S-tier DPS.


Character analysis
For a more detailed analysis of each character, check out the details below:
Hinagiku Akiba
tankbreakerHina does literally everything—her weakest job (DPS) is still equivalent to S‑tier. Her breaking and support utility are so unbelievable that I can’t imagine her kit ever being power‑crept. With no real flaws and pure upsides for any team, Hina has earned her SS‑tier placement.
Pros
- **Unbelievable Break Values
- **Unbelievable Damage
- **Unbelievable Utility
- **Unbelievably Easy
Cons
- **N/A
Jio Takinogawa
 debuffer
Jio is a solid all rounder in theory, but in reality his primary reason to be played is his unique 25% armor shred and ability to deal decent break damage. Jio's main gimmick comes from his Venom, a damage over time [DOT] debuff that deals a little damage per tick based on how many stacks are on the enemy. When the Venom reaches its cap it will detonate, dealing AOE damage to all nearby enemies. While the damage can be improved, including making the detonation crit, it's not enough to consider him a main DPS when compared to the dedicated DPS characters. His break damage is also quite good, but not exceptional enough to call him a dedicated breaker. However, no other character in the game can apply armor shred, which combined with the above factors results in a surprisingly good character.
Pros
- Lethal Debuff
- Great AOE
- Good Break
- Many Hits
Cons
- Average Overall
- Easily Replaceable
Kazuki Aoyama
breakerKazuki is the best breaker in the game and it’s not even close. With unmatched break speeds, good damage output, fast animations, and low stamina costs, Kazuki can facilitate quick clears better than anyone. These traits also make him a solid breaker in the AI's hands, though his optimal break speeds are fully realized when piloted by the player. Unless you’re a diehard Senju or Yo main or simply dislike Kazuki, there is no debate: Kazuki is a solid addition to your roster and well worth your pulls. His banner gains extra value thanks to having Iroha as a rate up; Mita is also a decent option with some really good dupes.
Pros
- Fastest break speed
- Massive hitbox
- High DPS when overclocked
- Low stamina cost
Cons
- Limited Memory
- Poor gem potential
Enoki Yukigaya
attackerWielding a massive claymore and even more massive damage, Enoki is a powerhouse DPS who embodies high risk and high reward. Her main damage comes from her strategy skill Grill Impact, a leaping attack that deals nearly half the damage of most ultimates. However, she can only use this ability once her heat is stacked up. Heat is built via the fourth hit of her primary attack, her secondary, her counterattack, and her perfect dodge attack. Any enemy hit resets all her heat. Combined with low defenses and a second passive that drains her life for more damage, Enoki is one of the riskiest yet most rewarding characters in Tribe Nine.
Pros
- Absurd Damage Output
- Win More DPS
- Nuclear Option
Cons
- Risky Gameplay
- Manual Preferred
- Enemy Aggression Reliant
Miu Jujo
 nuker
nukerMiu is a high-damaging DPS with solid output and possibly the strongest ultimate in the game once charged. To charge her ultimate, she first uses her strategy skill Vertical Crystal to drop a turret. Enemies hit within its AOE build charge with every instance of damage. Although it may take some time to fully charge her ultimate, her chain attack can quickly generate a large charge. While Miu is mostly flawless, she suffers from poor break values on her primary and secondary attacks, and her turret does no break damage at all. As such, she relies on teammates to provide the break needed to fund her ultimate and help her gain charge. However, this downside is easily negated as bosses melt once hit by her fully charged ultimate, which costs only one bar to activate and delivers up to 20 hits of high damage, further boosted by levelling her second passive.
Pros
- Great DPS
- Lightning Fast
- Life Bar Melting Ultimate
Cons
- Poor Breaker
- Ramp Up Time
- Multi Hit Ult
Tsuki Iroha
nukerOne of the starting characters you get. Don't let her free status fool you; Iroha is one of the strongest characters in the game once she has enough rank ups. This is thanks to her second passive providing her with a massive boost in damage based on a percent of her support stat. This not only makes her ultimate deal extremely high damage, it also buffs her follow up DPS for a short time afterwards. Combined with her already solid DPS and break values, Iroha is a sub DPS that really makes one question if she's actually a main DPS. And if that isn't enough for you, she also gives your team crit rate on her chain skill, which combined with the support stat you've likely invested in, will utterly nuke bosses off the full chain rotation into Iroha ultimate.
Pros
- Ranged Breaker
- Decent Buffer
- Nuclear Ultimate
- Tension Builder
Cons
- Low Sustained DPS
- Mobbing
- Delayed Ult
- Weak Until End Game
Tsuruko Semba
attackerall rounderHow can a character be both a top tier support and DPS? By having two powerful yet viable specs based on which passive you level up. Tsuruko is the first limited character in Tribe Nine and proves her power through sheer versatility and high DPS. As she damages enemies, she charges up her Unending Twilight; once maxed, it creates a large field that either heals allies (boosted by her first passive) or removes healing to deal bonus damage based on her support stat (via her second passive). With two very different builds, Tsuruko can fulfill multiple roles while outperforming most competitors. Her only real weakness is her spotty AI; she's best played manually to fully maximize her potential.
Pros
- Top Tier Support
- Top Tier DPS
Cons
- Requires her Zone
- Low Damage Ultimate
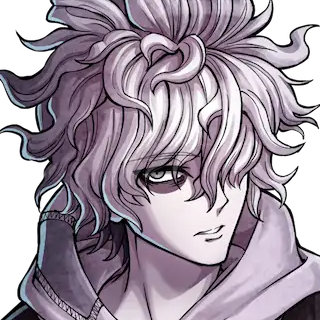
Hyakuichitaro Senju
breakerWhile Senju's kit makes him seem like a supportive DPS that protects his allies at the cost of his own life, his true purpose is as a speedy breaker quickly generating tension for the team to quickly kill bosses. For the sake of completion we'll cover his shield. Whenever the third hit of his primary attack string, strategy skill, or chain attack land, Senju gains a certain amount of Fighting Spirit. When reaching the maximum amount, he applies a shield to his teammates that reduces damage taken, but also redirects the damage to his own life bar. That being said, there's no real reason to think about this when you can instead spam his secondary attack for a massive 600 break value per swing, unmatched by any character in the game currently. This does necessitate manual play as the AI prioritizes his mostly useless shields, but with the right partners allows for some of the fastest clears possible.
Pros
- Secondary Attack
- Cheap Ultimate
- Fighting Spirit
Cons
- One Trick Pony
- Manual Only
- Self Damage Woes
Yo Kuronaka
all rounderIt's not every day that the main character of a gacha game is a top tier contender, but Yo's kit more than justifies this placement. His kit flows smoothly: his primary attack is fast, and his secondary attack, while a bit committal, activates his unique passive [Burt Drive] which triggers both potential passives and his strategy skill Hitting Stride. His first passive gives a massive boost to primary and strategy damage, while his second heals the team based on damage dealt in [Burst Drive]. With excellent passives and high break values, Yo excels in every role, earning him the title of the best (and only) all-rounder.
Pros
- Jack of All Trades, Master of Everything
- Simple To Learn
Cons
- Specificity
- Stamina Woes
- Weak Early Game
Q
tankQ comes winging in as a fairly underwhelming character upon initial impression. However, while he may lack an immediately obvious and abusable trait he makes up for by simply doing everything well. Make no mistake; Q is no DPS or breaker. He's outclassed on both fronts by dedicated characters. But he splits the difference well enough to stand out off of pure role compression, while also being a very strong tank. His strategy skill Declaration applies a global taunt once it is fully cast, then enters [Berserk] state allowing him to automatically dodge attacks with the first two attacks of his primary string or counterattack on the third. This is not reliable in the slightest and really just serves to cover a mistake you may have made. He also gets a new strategy skill (Frantic Impale) which deals decent damage and break for a low stamina cost. As AI Q is notably quite bad, it is highly suggested to manually pilot Q to ensure a smoother battle.
Pros
- Jack of all Trades
- Naturally Evasive
- Passive 2
Cons
- Master of None
- Manual Tank
Roku Saigo
tankThe ultimate tank in terms of pure survivability. With the simple press of his strategy skill Shock Absorber, Saigo becomes nigh immortal as he trades his stamina for a massive 70% damage reduction. While "blocking" attacks in this state, Saigo builds up his rage, granting him bonus defense percent based on the amount of rage he has. With his first passive, he also gains health regen based on his rage, while his second passive turns his ultimate into a high damage nuke (albeit at the cost of 3 bars). Unlike his competition, AI Saigo is also noteworthy as being one of the best AI options in the cast, doing its job quite well outside of its propensity to fully charge his secondary attack. Because of this, and because he's a free character, Saigo is a solid character to bring with you to almost anything. That being said, Saigo isn't perfect. His damage is awful, although certainly better than other support characters placed lower on the tier list. His break seems good from a numbers perspective, but his slow animations result in his break speed being deceptively slower than expected. While his ultimate CAN do big damage, it still lacks in comparison to the DPS and high tier breakers. But no one in the game can take hits like Saigo can.
Pros
- The Wall
- Attention Grabber
- Big Breaker
- Big Ultimate
Cons
- Long Animations
- Low DPS
- Unnecessary Role
Eiji Todoroki
bufferTodoroki is one of the best supports in the game, serving as both a tank and a buffer. His key strength lies in his strategy skill Spotlight, which creates a field that boosts the crit rate of allies within its range. Every time allies deal damage in his spotlight, they gain a self-buff that refunds part of the cost (effectively turning it into a 1-bar ultimate, though 2 bars are still needed to activate it) and extends the ultimate's duration (up to 25 seconds). Additionally, his second passive generates tension for the team, a rare trait. Upon ulting, he grants a buff that increases the primary and secondary attack multipliers of your team by a staggering 60%. This effect can be further enhanced by leveling his first passive.
Pros
- Spotlight
- Free Ultimate
- Supreme Buffs
- Bonus Tank
Cons
- Currently Unneeded
- No DPS/Break
Yutaka Gotanda
attackerA simple yet effective ranged DPS, Gotanda beams down his enemies before unleashing a devastating ultimate. His playstyle is straightforward: build up charge using either primary fire (slow but costs no stamina) or, ideally, secondary fire (high-damage laser that quickly builds charge but consumes stamina). You can spend the charge on his strategy skill or hold it to boost the crit rate on his ultimate. He can further increase ultimate damage by leveling his first passive or buff his team's attack with his second passive.
Pros
- Simple
- Safe
- Great Mobbing
Cons
- Mediocre Break Damage
- Mediocre Strategy Skill
Minami Oi
healerMinami makes a strange case for a team slot. Her poor damage, terrible break values, and heal over time focus make her utterly outclassed by Tsuruko and only a sidegrade to Koichi. What pushes her over the edge is her stalling potential. When paired with a tank, Minami can grind any fight to a halt, slowly winning via a war of attrition thanks to her consistent healing and powerful shield. This is not a particularly recommended strategy, but if you're having issues fighting a boss it is a valid option.
Pros
- Healing
- Shielding
Cons
- Terrible Damage
- Opportunity Cost
Mita Santaro
bufferA buffer with an evasion tank spin, Mita is a decent option as a support. He is unfortunately held back due to superior options existing on all fronts, but his unique ability to buff the Attack and Support stats allow him a niche use case for very specific teams. Unfortunately, these teams don't actually need buffs, or a tank, to function properly. To even access his buffing capabilities requires him to apply the debuff [Illusion] to the enemy, which allows him to automatically dodge an attack from them and gain a stack of [Energize]. With 3 stacks of [Energize], his next secondary attack will instead launch his buff to the closest ally. However, the buff decays over time, losing a stack every 5 seconds. With all these conditional and positional requirements, the question of whether it's worth all that effort certainly comes to mind.
Pros
- Illusion
- Solid Buff
- Decent Numbers
Cons
- Dupe Hungry
- Awkward Buff
Koishi Kohinata
healerProviding a massive burst of healing and not much else, Koishi is unfortunately a very mediocre character. He is a free character at least, so if you lack better options you don't have much of a choice if you want a healer.
Pros
- Secondary Attack
- Burst Healing
Cons
- Long Cooldowns
- Expensive Ultimate
- Outclassed